For this tutorial, I'm using Unity 6. Note that everything we are doing here should also work in older versions, as it doesn't use anything specific from Unity 6. However, some things must be named differently, mostly in the RendererFeature section.
Because, yes, I'm using the URP, to have access to the RendererFeatures, which will be useful to apply a grainy paper texture over the screen. I'll show you how to create the watercolor shader in HLSL. So if you're not comfortable with this, I encourage you to pay close attention to the tutorial steps to better understand the logic behind it! I won't explain everything about the shaders' magic here, but I'll try my best to be crystal clear about what we're doing in this shader to achieve our watercolor effect.
Let's setup the scene properly:
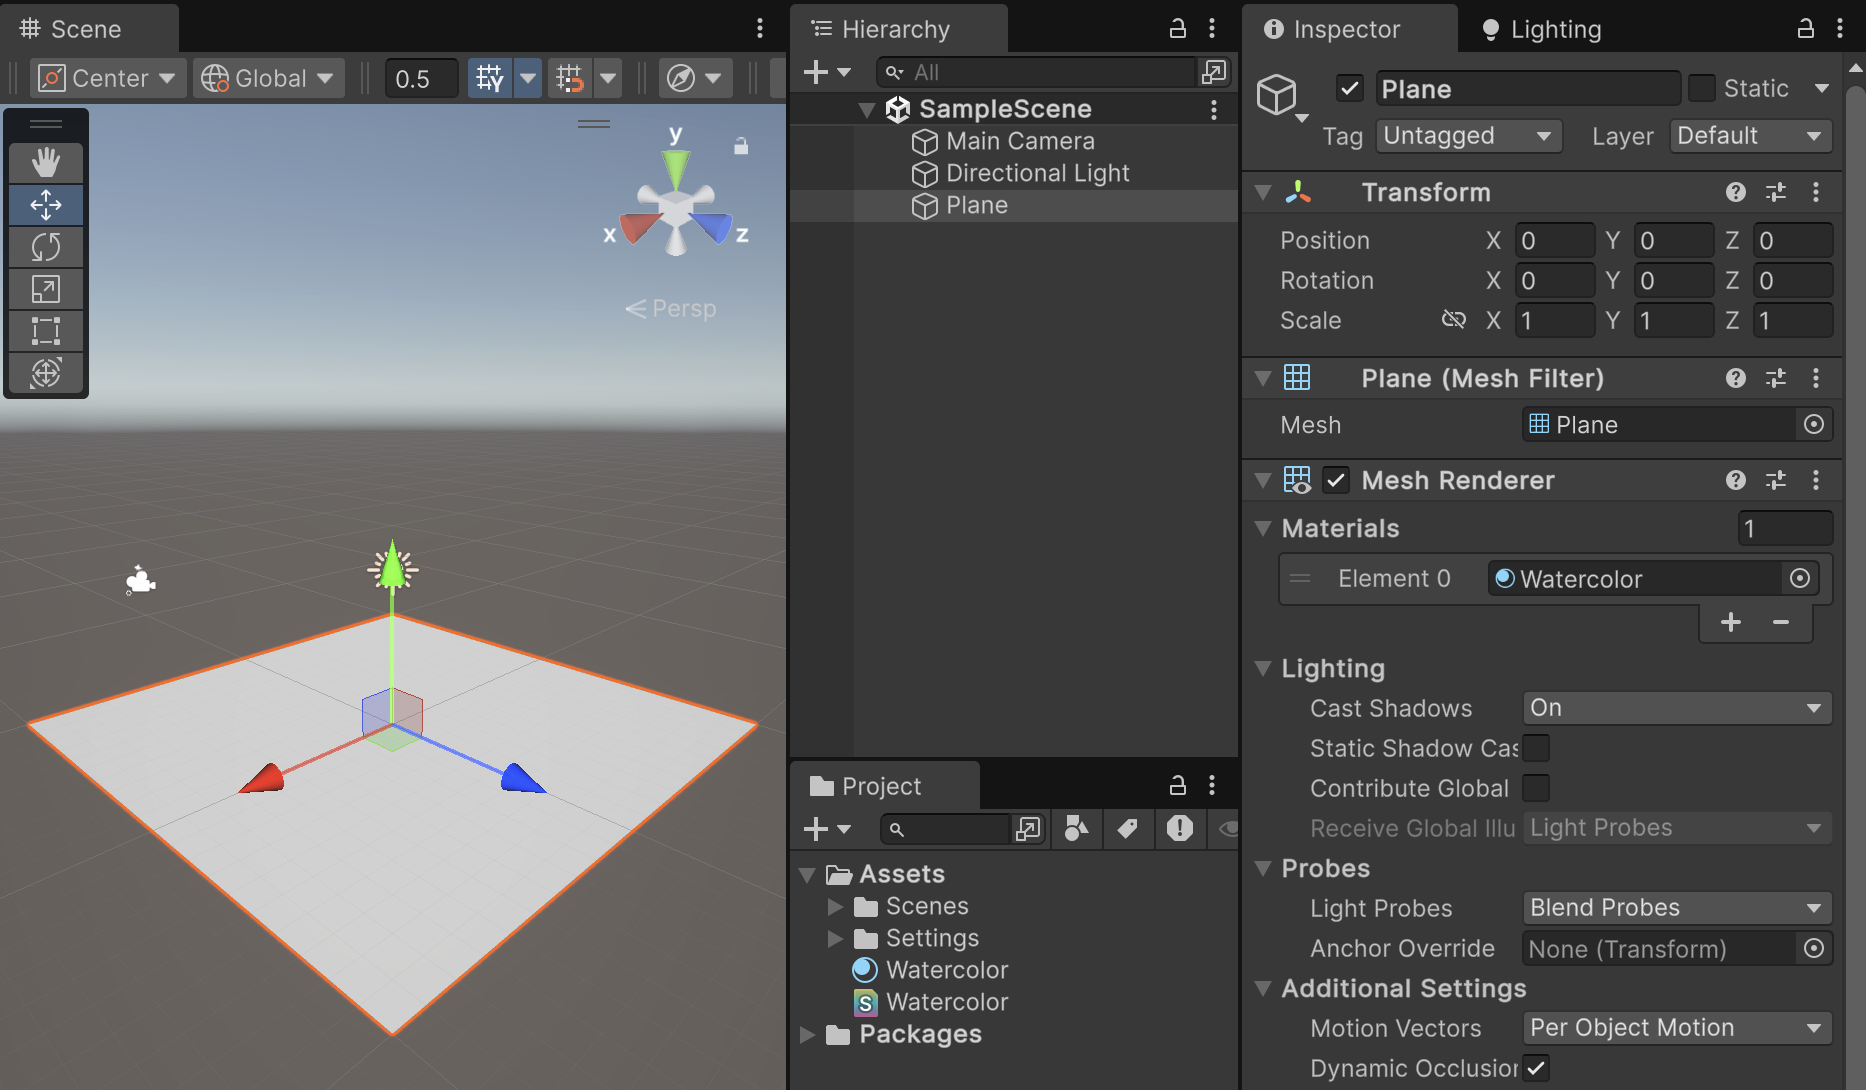
- add a plane in your scene (GameObject > 3D Object > Plane)
- create a 'watercolor' shader (Assets > Create > Shader > Unlit shader)
- create a material (right-click on the watercolor shader > Create > Material)
- apply the material on the plane.
Let's open our shader, and replace everything with this:
Shader "Watercolor" { Properties // every public shader properties shown in the Inspector { _Color("Color", Color) = (1,1,1,1) } SubShader { Tags { "Queue" = "Transparent" "RenderType" = "Transparent" } Pass // Define the shader pass { Blend SrcAlpha OneMinusSrcAlpha // Use common transparency HLSLPROGRAM // the HLSL code starts here #pragma vertex vert // define vertex function (called per vertex) #pragma fragment frag // define fragment function (called per fragment/pixel) // include Unity URP core functions #include "Packages/com.unity.render-pipelines.universal/ShaderLibrary/Core.hlsl" // data received from the GPU workflow struct appdata { float3 posOS : POSITION; // vertex position in object space UNITY_VERTEX_INPUT_INSTANCE_ID }; // data we send from the vertex shader to the fragment shader struct v2f { float4 posCS : SV_POSITION; // fragment position in clip space UNITY_VERTEX_INPUT_INSTANCE_ID UNITY_VERTEX_OUTPUT_STEREO }; CBUFFER_START(UnityPerMaterial) half4 _Color; CBUFFER_END v2f vert(appdata _input) { v2f output; UNITY_SETUP_INSTANCE_ID(_input); UNITY_TRANSFER_INSTANCE_ID(_input, output); UNITY_INITIALIZE_VERTEX_OUTPUT_STEREO(output); // use matrices to transform the vertex position from object space to clip space output.posCS = TransformObjectToHClip(_input.posOS); return output; } half4 frag(v2f _input) : SV_Target { UNITY_SETUP_INSTANCE_ID(_input); UNITY_SETUP_STEREO_EYE_INDEX_POST_VERTEX(_input); return _Color; // just returning the defined color } ENDHLSL // end of the HLSL code } } }
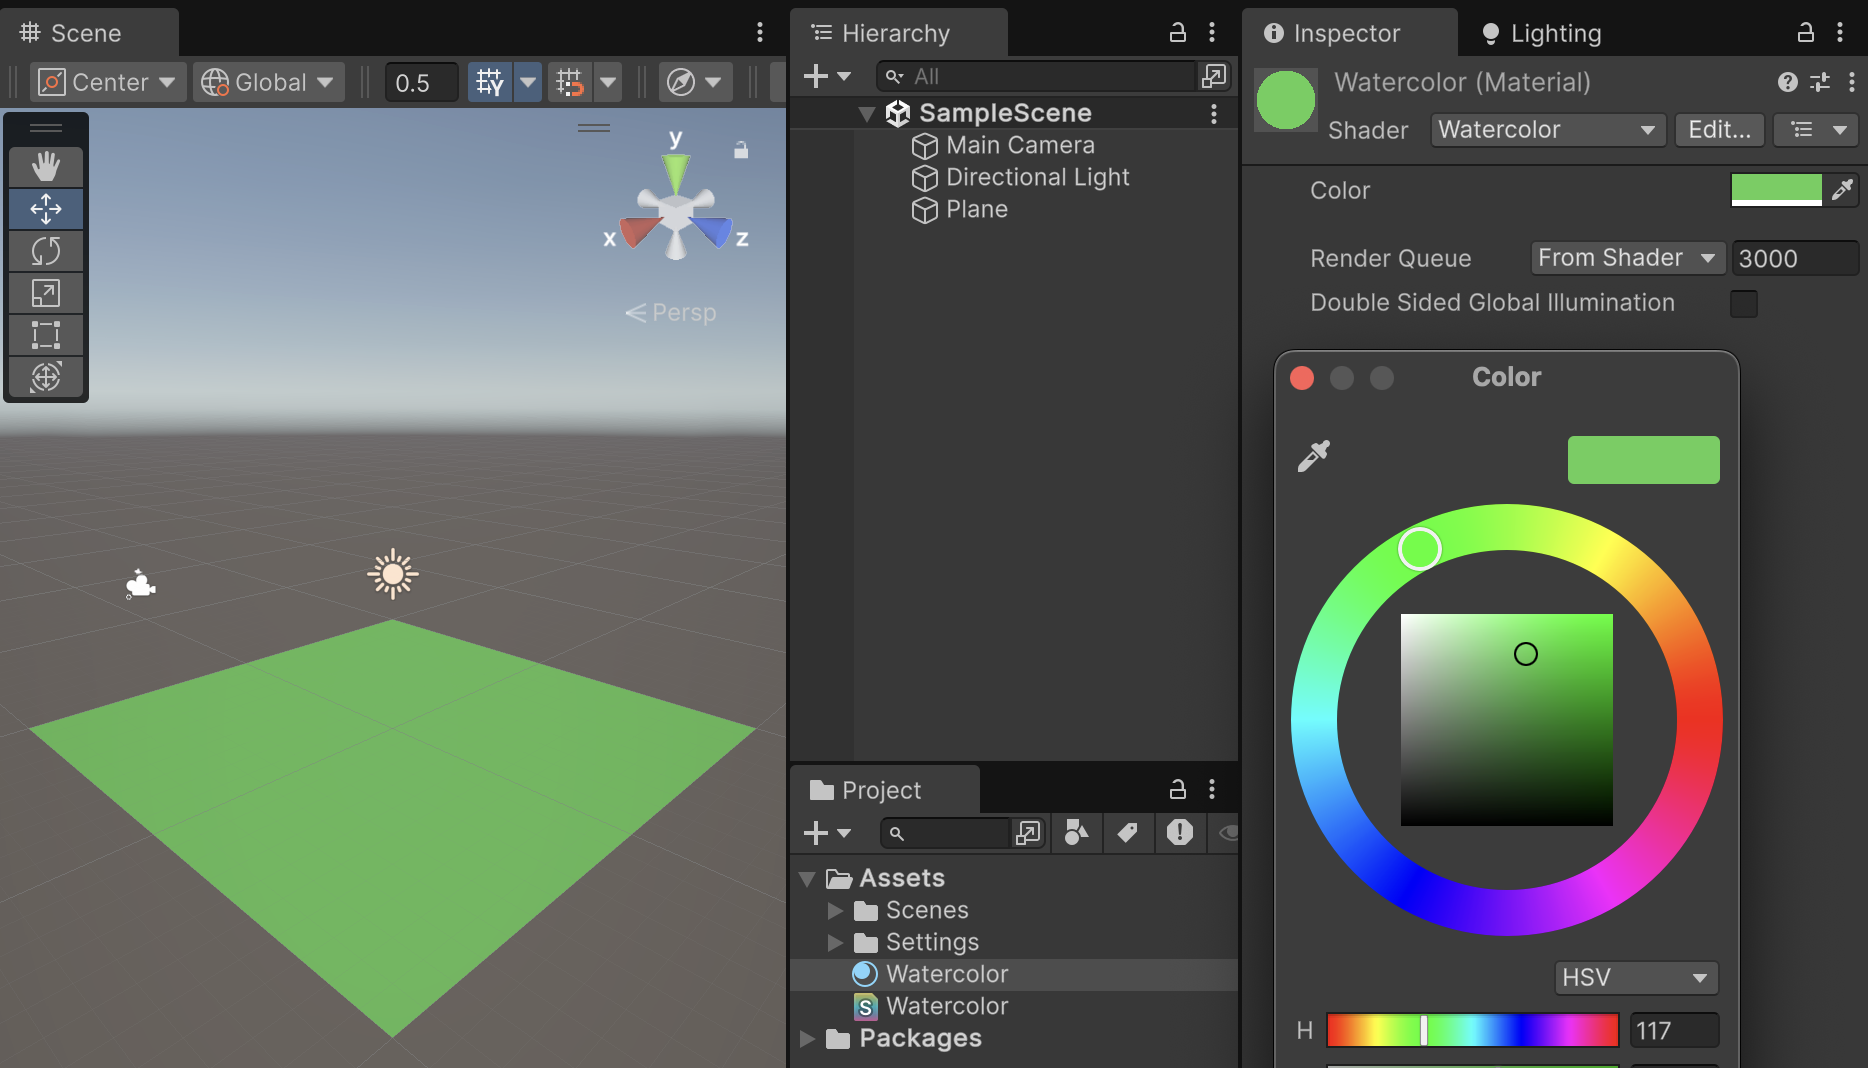
This shader is very basic and only allows us to set the material color. Once again, I won't explain how it works, but I put some comments to help a bit.
Now, we can create our shader. I took some inspiration from this awesome tutorial by Kai on youtube.
These are the steps we'll go through:
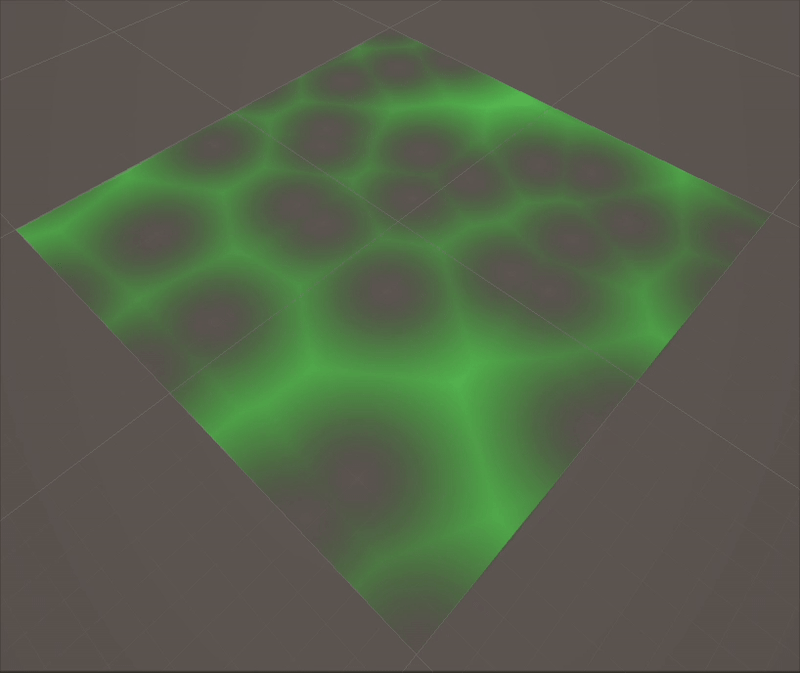
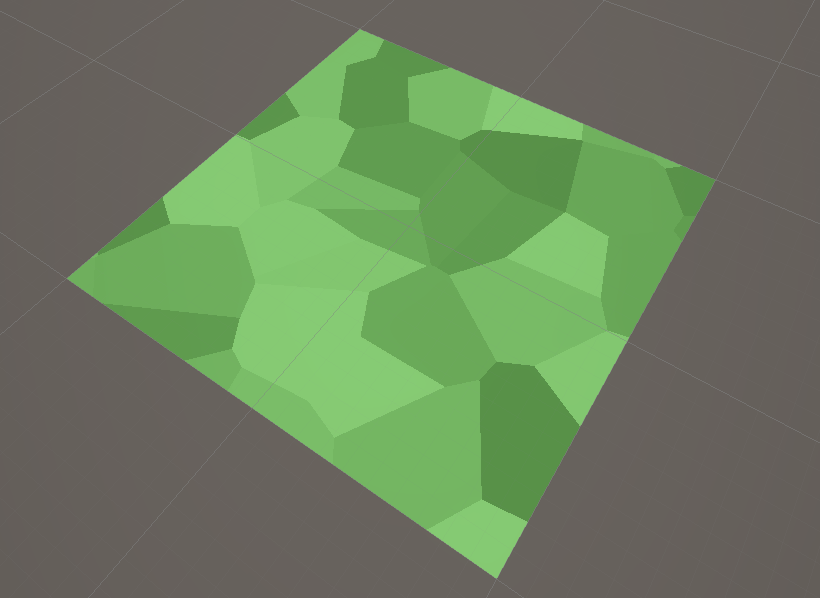
- implementing a Voronoi pattern to have color variations on our surface
- smoothing the voronoi pattern result in order to smooth the color variations, and get our watercolor effect
- using a radius to create a stain on our surface.
Let's start with the first step. For getting the voronoi function, I simply checked the unity shadergraph's voronoi node source code. If you want more information about Voronoi, don't hesitate to check the wikipedia's page.
Anyway, this is the result you can put over the frag function.
inline float2 GetVoronoiRandomVector(float2 _uv, float _offset) { float2x2 m = float2x2(15.27, 47.63, 99.41, 89.98); _uv = frac(sin(mul(_uv, m)) * 46839.32); return float2(sin(_uv.y * _offset) * 0.5 + 0.5, cos(_uv.x * _offset) * 0.5 + 0.5); } void Voronoi_float(float2 _uv, float _angleOffset, float _cellDensity, out float _noise, out float _cells) { float2 g = floor(_uv * _cellDensity); float2 f = frac(_uv * _cellDensity); float3 res = float3(8.0, 0.0, 0.0); for (int y = -1; y <= 1; y++) { for (int x = -1; x <= 1; x++) { float2 lattice = float2(x, y); float2 offset = GetVoronoiRandomVector(lattice + g, _angleOffset); float d = distance(lattice + offset, f); if (d < res.x) { res = float3(d, offset.x, offset.y); _noise = res.x; _cells = res.y; } } } }
As you can see, there are two functions: 'GetVoronoiRandomVector' and 'Voronoi_float'. GetVoronoiRandomVector is called by Voronoi_float, and this is Voronoi_float we'll call in our frag function to apply the voronoi noise.
The Voronoi_float function has several parameters:
- a float2 '_uv', a float '_angleOffset' and a float '_cellDensity' we need to provide to the Voronoi algorithm,
- a float '_noise' and a float '_cells' values, which will contain the voronoi results.
To start, we'll provide the object UV. To do so, we need to get the object UV from the appdata struct. And send it to our fragment shader through the v2f struct.
struct appdata { float3 posOS : POSITION; float2 uv : TEXCOORD0; // TEXCOORD0 contains the object UV UNITY_VERTEX_INPUT_INSTANCE_ID };
struct v2f { float4 posCS : SV_POSITION; float2 uv : TEXCOORD0; // so we'll use the UV during fragment shader UNITY_VERTEX_INPUT_INSTANCE_ID UNITY_VERTEX_OUTPUT_STEREO };
In the vert function, we need to set the UV in the v2f struct instance 'output'.
v2f vert(appdata _input) { v2f output; UNITY_SETUP_INSTANCE_ID(_input); UNITY_TRANSFER_INSTANCE_ID(_input, output); UNITY_INITIALIZE_VERTEX_OUTPUT_STEREO(output); output.posCS = TransformObjectToHClip(_input.posOS); output.uv = _input.uv; // as simple as that! return output; }
Then, we'll provide the angle offset and the cell density through two parameters. We declare them in the Properties section to be able to define them in the Unity Inspector. And we declare them in the HLSL code so we can use them in our frag function.
Properties { _Color("Color", Color) = (1,1,1,1) _AngleOffset("Angle offset", Float) = 1.0 _CellDensity("Cell density", Float) = 1.0 }
CBUFFER_START(UnityPerMaterial) half4 _Color; half _AngleOffset; half _CellDensity; CBUFFER_END
Now, we have everything we need to give to the Voronoi function. Let's call it in the frag function!
half4 frag(v2f _input) : SV_Target { UNITY_SETUP_INSTANCE_ID(_input); UNITY_SETUP_STEREO_EYE_INDEX_POST_VERTEX(_input); float noise = 0.0, cells = 0.0; // we declare values to store voronoi results Voronoi_float(_input.uv, _AngleOffset, _CellDensity, noise, cells); // Voronoi's magic float4 color = _Color; color *= noise; // we multiply the color with the voronoi noise return color; }
Back to Unity. You can select the Watercolor material, set the Cell Density to 5 for instance, and play with the Angle offset value to see the result.
At this point, we don't want any transparency. It happens because we also multiply the color alpha by the noise value. To prevent that, we can explicitly ask to multiply only the rgb values.
color.rgb *= noise; // we multiply the color with the voronoi noise
Also, for our shader, we don't need the noise result, but the cells result. This cells value range is [0;1], so we can add 0.5 to multiply the color by a range of [0.5;1.5], in order to have color variations a bit darker or a bit brighter than the given color (instead of just darker).
color.rgb *= cells + 0.5;
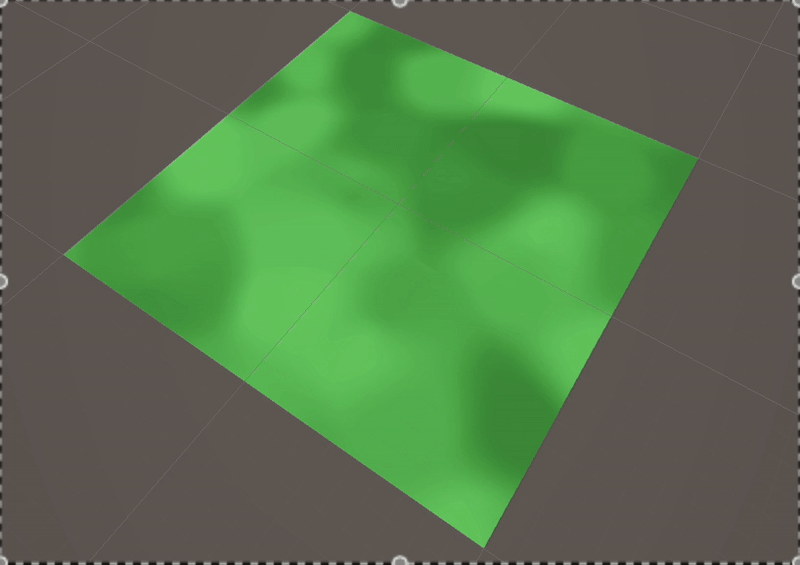
New step: we have to smooth the voronoi cells to simulation the color variations properly. In his tutorial, Kai simply activates the "smooth" option on the Blender's voronoi node, which we obviously don't have here. So I checked directly the Blender's git source code to implement it and update the Voronoi_float function accordingly.
void Voronoi_float(float2 _uv, float _angleOffset, float _cellDensity, float _smoothness, out float _noise, out float _cells) { float2 g = floor(_uv * _cellDensity); float2 f = frac(_uv * _cellDensity); //float3 res = float3(8.0, 0.0, 0.0); float smoothDistance = 0.0; _cells = 0.0; _noise = 0.0; float h = -1.0; for (int y = -1; y <= 1; y++) { for (int x = -1; x <= 1; x++) { float2 lattice = float2(x, y); float2 offset = GetVoronoiRandomVector(lattice + g, _angleOffset); float d = distance(lattice + offset, f); // if (d < res.x) // { // res = float3(d, offset.x, offset.y); // _noise = res.x; // _cells = res.y; // } h = h == -1.0f ? 1.0 : smoothstep(0.0, 1.0, 0.5 + 0.5 * (smoothDistance - d) / _smoothness); float correctionFactor = _smoothness * h * (1.0 - h); smoothDistance = lerp(smoothDistance, d, h) - correctionFactor; correctionFactor /= 1.0 + 3.0 * _smoothness; float cell = offset.x; _cells = lerp(_cells, cell, h) - correctionFactor; float pos = d; _noise = lerp(_noise, pos, h) - correctionFactor; } } }
As you can see, we now have a _smoothness parameter to fulfill! Let's add a _Smoothness parameter in our shader.
Properties { _Color("Color", Color) = (1,1,1,1) _AngleOffset("Angle offset", Float) = 1.0 _CellDensity("Cell density", Float) = 1.0 _Smoothness("Smoothness", Range(0,1)) = 0.5 }
Declare it in the HLSL code as well.
CBUFFER_START(UnityPerMaterial) half4 _Color; half _AngleOffset; half _CellDensity; half _Smoothness; CBUFFER_END
And finally set it to the updated Voronoi_float, within the frag function.
Voronoi_float(_input.uv, _AngleOffset, _CellDensity, _Smoothness, noise, cells); // Voronoi's magic
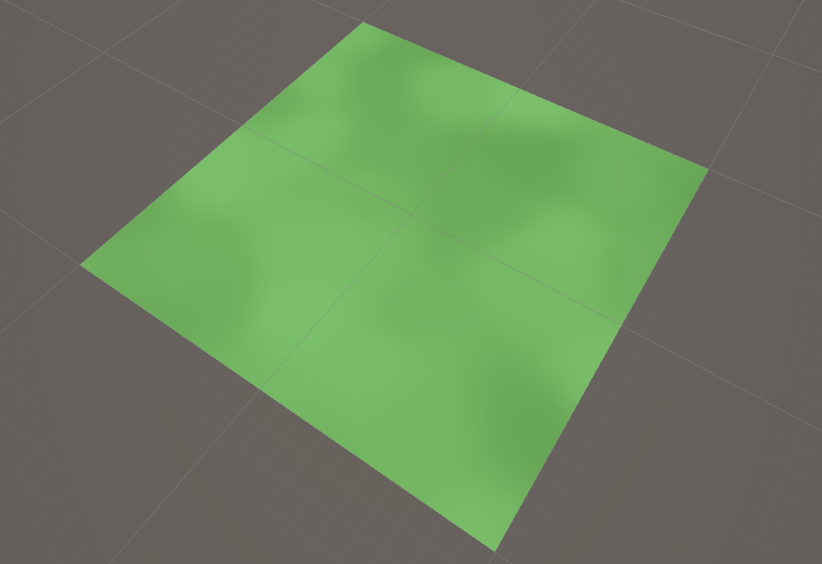
Our voronoi cells are now smoothed. Now, we can add a _Power variable to control the variation power. Same ritual: add a _Power to properties, declare it in HLSL code and use it in the frag function.
Properties { _Color("Color", Color) = (1,1,1,1) _AngleOffset("Angle offset", Float) = 1.0 _CellDensity("Cell density", Float) = 1.0 _Smoothness("Smoothness", Range(0,1)) = 0.5 _Power("Power", Range(0,5)) = 1.0 }
CBUFFER_START(UnityPerMaterial) half4 _Color; half _AngleOffset; half _CellDensity; half _Smoothness; half _Power; CBUFFER_END
float4 color = _Color; cells = pow(cells + 0.5, _Power); // apply power color.rgb *= cells; // we multiply the color with the voronoi noise return color;
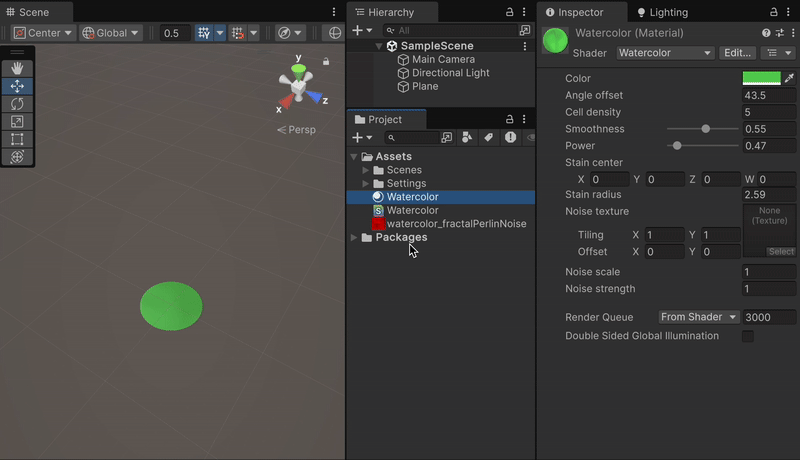
With this, we can play with the Watercolor material Smoothness and Power to set the color variation we are looking for (and don't forget the Cell density for changing the cells size, and the Angle offset for updating the cells shapes).
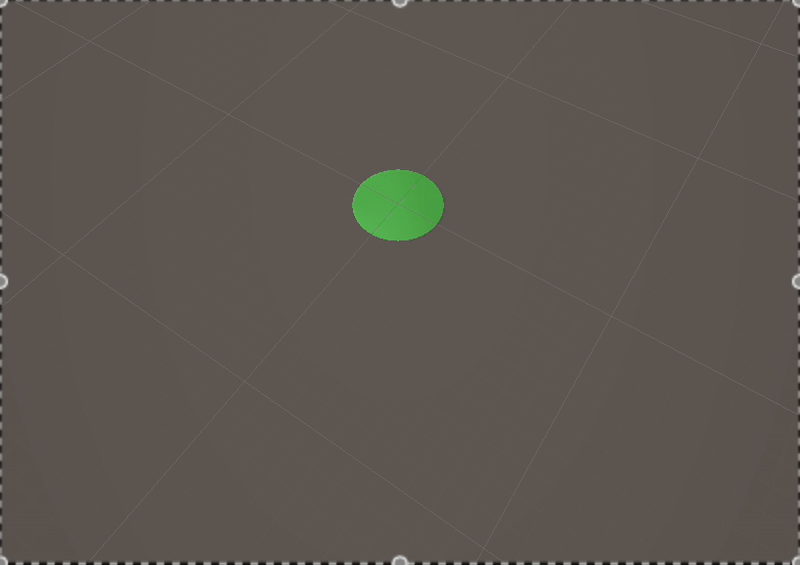
For the stain effect, we need a center pos, and a radius.
Properties { _Color("Color", Color) = (1,1,1,1) _AngleOffset("Angle offset", Float) = 1.0 _CellDensity("Cell density", Float) = 1.0 _Smoothness("Smoothness", Range(0,1)) = 0.5 _Power("Power", Range(0, 5)) = 1.0 _Center("Stain center", Vector) = (0,0,0,0) // ready for _Radius("Stain radius", Float) = 1.0 // action! }
As with everything else in shaders, there are many ways to do things. The choices will depend of our needs. Here, we have a plane facing the Y-axis. So, instead of using the object UV, we can use the position's X and Z in world space.
To do so, we need to store the position in world space in the v2f structure, in order to use in the fragment shader (= in our frag function). First, we add the posWS value in the v2f struct.
struct v2f { float4 posCS : SV_POSITION; float2 uv : TEXCOORD0; float3 posWS : VAR_POS; UNITY_VERTEX_INPUT_INSTANCE_ID UNITY_VERTEX_OUTPUT_STEREO };
Then, we need to fulfill this variable during the vertex shader (= our vert function).
Instead of using the TransformObjectToHClip function, which directly set our vertex position from object space to clip space, we'll use:
- the TransformObjectToWorld function to get the vertex position in world space,
- then, the TransformWorldToHClip function, to get the vertex position in clip space.
Note, that we could also simply use the TransformObjectToWorld function aside of the TransformObjectToHClip function. But TransformObjectToHClip is kind of a mix of TransformObjectToWorld + TransformWorldToHClip, it's better for performance to do this:
// output.posCS = TransformObjectToHClip(_input.posOS); output.posWS = TransformObjectToWorld(_input.posOS); output.posCS = TransformWorldToHClip(output.posWS); output.uv = _input.uv; return output;
Now, we can use this posWS in the frag function. We need to check the fragment/pixel world pos, check its distance from the given _Center. If the distance is bigger than _Radius value, then it's out of the strain, and we set color alpha to 0.
First, we need to declare _Center and _Radius in the HLSL code.
CBUFFER_START(UnityPerMaterial) half4 _Color; half _AngleOffset; half _CellDensity; half _Smoothness; half _Power; half2 _Center; // only half2, because we are on a plane here half _Radius; CBUFFER_END
Now, let's add stain logic in the frag function! (check the comments for explanations)
float4 color = _Color; cells = pow(cells + 0.5, _Power); // apply power color.rgb *= cells; // we multiply the color with the voronoi noise float2 worldPos = _input.posWS.xz; // we only use X,Z axes // we get the length of the vector from pos to center = distance from center float distFromCenter = length(_input.posWS.xz - _Center); // step(x,y) returns 1 if y > x, so inStain = 1 if _Radius > distFromCenter // and inStain = 0 if the distance from center is bigger than the wanted radius half inStain = step(distFromCenter, _Radius); color.a = inStain; return color;
Be sure your plane position is (0;0;0) and you will get this by playing with the Stain radius value.
We're almost done. We only need some noise to make it look more like a real stain! We can use this free seemless texture I edited.
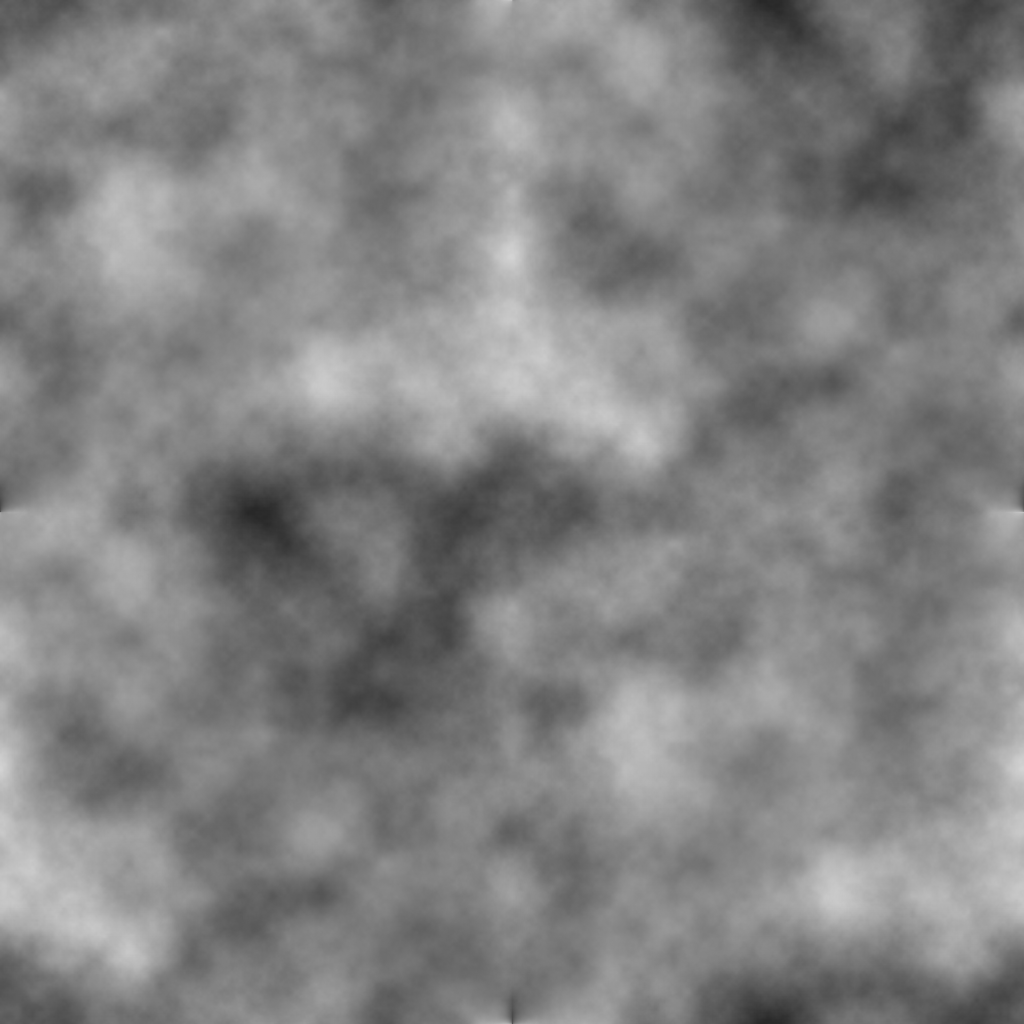
Download it, import it in Unity, and configure it as a single channel texture.
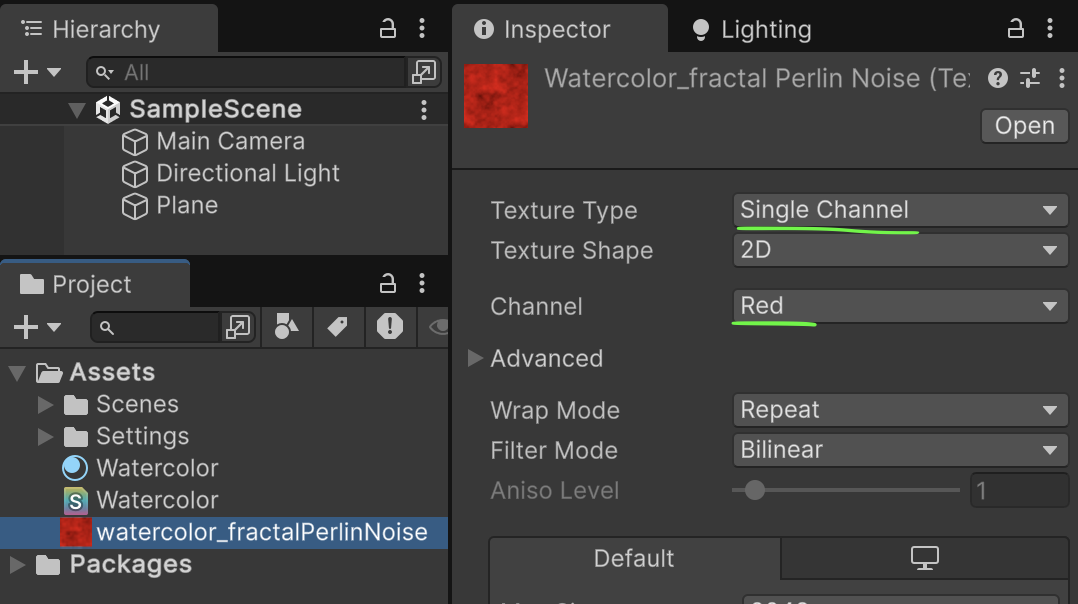
Let's use it in our shader. Again, same ritual: add a public property, declare the variable in the HLSL code, use it in the frag function. This tutorial is already huge enough, so we also add a _NoiseScale and a _NoiseStrength values to manage our noise properly.
Properties { _Color("Color", Color) = (1,1,1,1) _AngleOffset("Angle offset", Float) = 1.0 _CellDensity("Cell density", Float) = 1.0 _Smoothness("Smoothness", Range(0,1)) = 0.5 _Power("Power", Range(0, 5)) = 1.0 _Center("Stain center", Vector) = (0,0,0,0) _Radius("Stain radius", Float) = 1.0 _NoiseTex("Noise texture", 2D) = "white" {} // for the texture _NoiseScale("Noise scale", Float) = 1.0 // to manage the texture's scale _NoiseStrength("Noise strength", Float) = 1.0 // strength of the effect }
CBUFFER_START(UnityPerMaterial) half4 _Color; half _AngleOffset; half _CellDensity; half _Smoothness; half _Power; half2 _Center; half _Radius; TEXTURE2D(_NoiseTex); // contains the texture SAMPLER(sampler_NoiseTex); // allows us to sample the texture at given UV half _NoiseScale; half _NoiseStrength; CBUFFER_END
float2 worldPos = _input.posWS.xz; // we only use X,Z axes // sample noise texture // we could use the object UV, but here again, we are using the (X;Z) world pos instead float2 noiseUV = worldPos * _NoiseScale; float stainNoise = SAMPLE_TEXTURE2D(_NoiseTex, sampler_NoiseTex, noiseUV).r; // stainNoise value is in range [0;1], we want it in range [-1;1] stainNoise = stainNoise * 2 - 1; stainNoise *= _NoiseStrength; // finally, apply strength // we get the length of the vector from pos to center = distance from center float distFromCenter = length(_input.posWS.xz - _Center) + stainNoise; // we add the noise here! // step(x,y) returns 1 if y > x, so inStain = 1 if _Radius > distFromCenter // and inStain = 0 if the distance from center is bigger than the wanted radius half inStain = step(distFromCenter, _Radius); color.a = inStain; return color;
Here is the final version of the Watercolor shader:
Shader "Watercolor" { Properties { _Color("Color", Color) = (1,1,1,1) _AngleOffset("Angle offset", Float) = 1.0 _CellDensity("Cell density", Float) = 1.0 _Smoothness("Smoothness", Range(0,1)) = 0.5 _Power("Power", Range(0, 5)) = 1.0 _Center("Stain center", Vector) = (0,0,0,0) _Radius("Stain radius", Float) = 1.0 _NoiseTex("Noise texture", 2D) = "white" {} // for the texture _NoiseScale("Noise scale", Float) = 1.0 // to manage the texture's scale _NoiseStrength("Noise strength", Float) = 1.0 // strength of the effect } SubShader { Tags { "Queue" = "Transparent" "RenderType" = "Transparent" } LOD 100 Pass // Color { Blend SrcAlpha OneMinusSrcAlpha HLSLPROGRAM #pragma vertex vert #pragma fragment frag #include "Packages/com.unity.render-pipelines.universal/ShaderLibrary/Core.hlsl" struct appdata { float3 posOS : POSITION; float2 uv : TEXCOORD0; UNITY_VERTEX_INPUT_INSTANCE_ID }; struct v2f { float4 posCS : SV_POSITION; float2 uv : TEXCOORD0; float3 posWS : VAR_POS; UNITY_VERTEX_INPUT_INSTANCE_ID UNITY_VERTEX_OUTPUT_STEREO }; CBUFFER_START(UnityPerMaterial) half4 _Color; half _AngleOffset; half _CellDensity; half _Smoothness; half _Power; half2 _Center; half _Radius; TEXTURE2D(_NoiseTex); // contains the texture SAMPLER(sampler_NoiseTex); // allows us to sample the texture at given UV half _NoiseScale; half _NoiseStrength; CBUFFER_END v2f vert(appdata _input) { v2f output; UNITY_SETUP_INSTANCE_ID(_input); UNITY_TRANSFER_INSTANCE_ID(_input, output); UNITY_INITIALIZE_VERTEX_OUTPUT_STEREO(output); // output.posCS = TransformObjectToHClip(_input.posOS); output.posWS = TransformObjectToWorld(_input.posOS); output.posCS = TransformWorldToHClip(output.posWS); output.uv = _input.uv; return output; } inline float2 GetVoronoiRandomVector(float2 _uv, float _offset) { float2x2 m = float2x2(15.27, 47.63, 99.41, 89.98); _uv = frac(sin(mul(_uv, m)) * 46839.32); return float2(sin(_uv.y * _offset) * 0.5 + 0.5, cos(_uv.x * _offset) * 0.5 + 0.5); } void Voronoi_float(float2 _uv, float _angleOffset, float _cellDensity, float _smoothness, out float _noise, out float _cells) { float2 g = floor(_uv * _cellDensity); float2 f = frac(_uv * _cellDensity); //float3 res = float3(8.0, 0.0, 0.0); float smoothDistance = 0.0; _cells = 0.0; _noise = 0.0; float h = -1.0; for (int y = -1; y <= 1; y++) { for (int x = -1; x <= 1; x++) { float2 lattice = float2(x, y); float2 offset = GetVoronoiRandomVector(lattice + g, _angleOffset); float d = distance(lattice + offset, f); // if (d < res.x) // { // res = float3(d, offset.x, offset.y); // _noise = res.x; // _cells = res.y; // } h = h == -1.0f ? 1.0 : smoothstep(0.0, 1.0, 0.5 + 0.5 * (smoothDistance - d) / _smoothness); float correctionFactor = _smoothness * h * (1.0 - h); smoothDistance = lerp(smoothDistance, d, h) - correctionFactor; correctionFactor /= 1.0 + 3.0 * _smoothness; float cell = offset.x; _cells = lerp(_cells, cell, h) - correctionFactor; float pos = d; _noise = lerp(_noise, pos, h) - correctionFactor; } } } half4 frag(v2f _input) : SV_Target { UNITY_SETUP_INSTANCE_ID(_input); UNITY_SETUP_STEREO_EYE_INDEX_POST_VERTEX(_input); float noise = 0.0, cells = 0.0; // we declare values to store voronoi results Voronoi_float(_input.uv, _AngleOffset, _CellDensity, _Smoothness, noise, cells); // Voronoi's magic float4 color = _Color; cells = pow(cells + 0.5, _Power); // apply power color.rgb *= cells; // we multiply the color with the voronoi noise float2 worldPos = _input.posWS.xz; // we only use X,Z axes // sample noise texture // we could use the object UV, but here again, we are using the (X;Z) world pos instead float2 noiseUV = worldPos * _NoiseScale; float stainNoise = SAMPLE_TEXTURE2D(_NoiseTex, sampler_NoiseTex, noiseUV).r; // stainNoise value is in range [0;1], we want it in range [-1;1] stainNoise = stainNoise * 2 - 1; stainNoise *= _NoiseStrength; // finally, apply strength // we get the length of the vector from pos to center = distance from center float distFromCenter = length(_input.posWS.xz - _Center) + stainNoise; // we add the noise here! // step(x,y) returns 1 if y > x, so inStain = 1 if _Radius > distFromCenter // and inStain = 0 if the distance from center is bigger than the wanted radius half inStain = step(distFromCenter, _Radius); color.a = inStain; return color; } ENDHLSL } } }
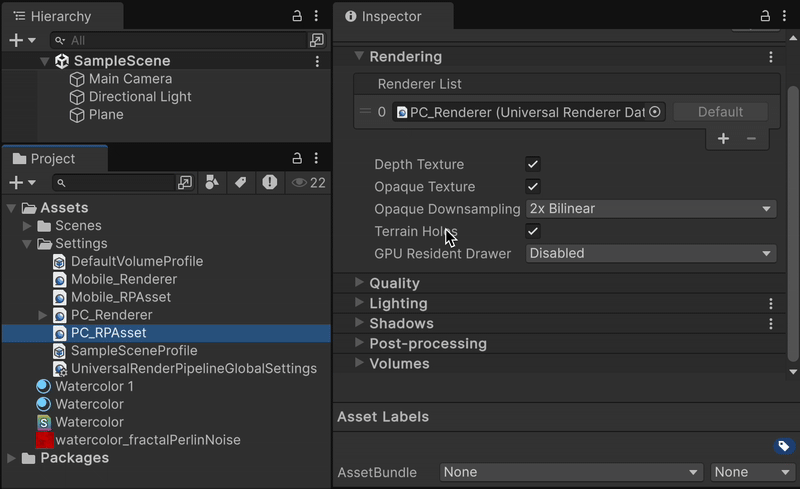
Last but not least, we can simulate a paper effect, by simply using a build-in RendererFeature provided by Unity: the FullScreenPassRendererFeature. Select the Renderer Data currently used by your Render Pipeline Asset, and add a FullScreenPassRendererFeature.
This renderer feature needs a material to apply an effect over the whole screen. Per default, it adds a material that inverts colors. Instead, we'll put a material that add the grainy paper texture. To do so, we need to create an other shader we'll apply on a new material.
- create a 'paper' shader (Assets > Create > Shader > Unlit shader),
- create a material (right-click on the paper shader > Create > Material).
Open the shader and replace everything by this:
Shader "Paper" { Properties { _PaperTexture("Texture", 2D) = "white" {} _Power("Power", Range(0.001, 3)) = 1.0 } SubShader { Tags { "RenderType"="Opaque" } Pass { HLSLPROGRAM #pragma vertex vert #pragma fragment frag #include "Packages/com.unity.render-pipelines.universal/ShaderLibrary/Core.hlsl" struct appdata { uint vertexID : SV_VertexID; }; struct v2f { float4 posCS : SV_POSITION; float2 uv : TEXCOORD0; float3 posWS : VAR_POS; }; TEXTURE2D(_BlitTexture); // Screen texture SAMPLER(sampler_BlitTexture); TEXTURE2D(_PaperTexture); // Paper texture SAMPLER(sampler_PaperTexture); half4 _PaperTexture_ST; half _Power; // Effect power v2f vert(appdata _input) { v2f output; output.posCS = GetFullScreenTriangleVertexPosition(_input.vertexID); output.uv = GetFullScreenTriangleTexCoord(_input.vertexID); return output; } half4 frag(v2f _input) : SV_Target { // We get the screen render at this pixel half4 render = SAMPLE_TEXTURE2D(_BlitTexture, sampler_BlitTexture, _input.uv); // We get the paper effect at this pixel half3 paper = SAMPLE_TEXTURE2D(_PaperTexture, sampler_PaperTexture, _input.uv.xy * _PaperTexture_ST.xy + _PaperTexture_ST.zw).rgb; paper = pow(paper, _Power); // We apply the paper effect on the screen render render.rgb *= paper; return render; } ENDHLSL } } }
Then, set the paper material to the renderer feature.
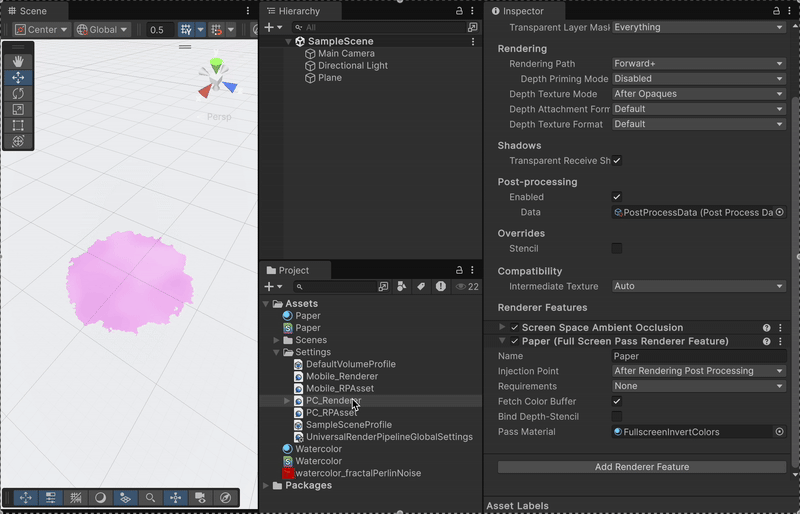
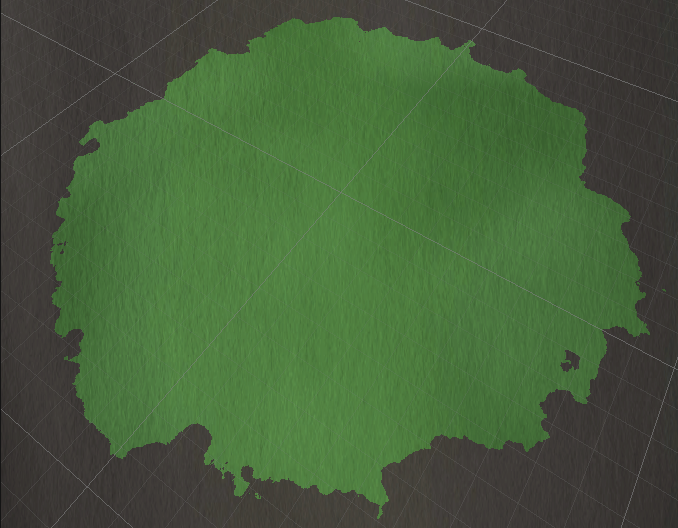
Nothing happens, because we didn't set a paper texture yet. Let's do it. I took a free paper texture from TextureLab. You can take a look, I took this one.
Download the image, import it in Unity, and drop it in the Texture field of the paper material. And voilĂ , the paper effect is on!
This tutorial is just a solid foundation for achieving a cool watercolor effect. The result can be improved in many ways!
- the stain borders are a bit sharp, we could smooth it by using something else than a step function for instance.
- we could use a Triplanar UV for the voronoi, to apply it on non-plane surfaces (even if we still using world position instead of the object UV)
- we could blend different colors, add noise to the voronoi pattern...
- we can merge this effect with outline
- we can take control of the material parameters in our scripts, to make the stain appear or disappear, to change its color...
I hope you enjoyed this tutorial and learned something new!
If you have any question, don't hesitate to ask. You can follow me and/or contact me on Bluesky!